Financial Systems General Tab
-
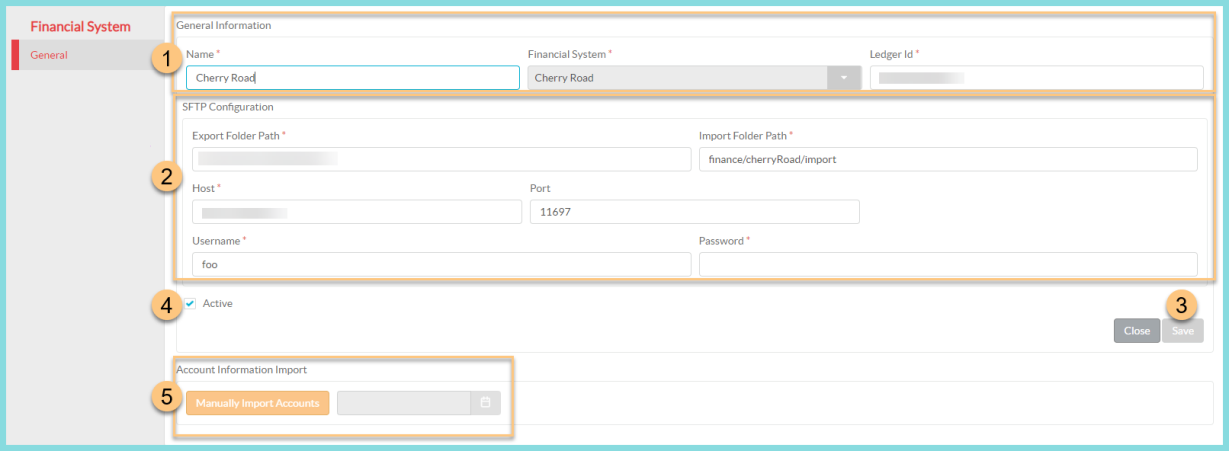
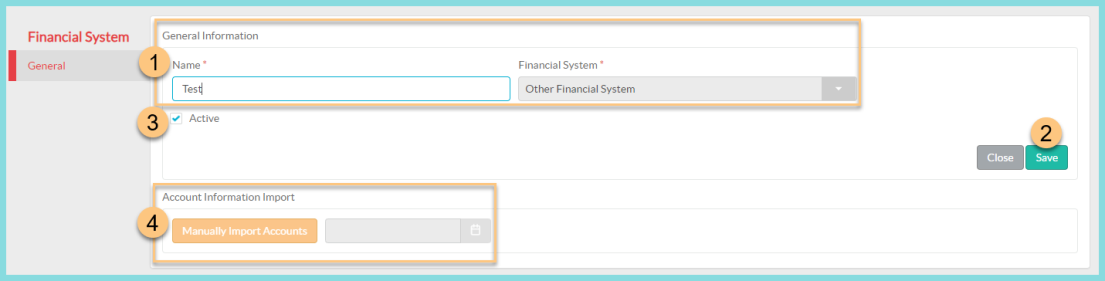
Notice the General Information.
-
View or edit the Name of the Financial System Integration.
-
View the integrated Financial System.
-
Enter the unique Ledger Id.
-
-
Enter the SFTP Configuration information for Cherry Road.
Note: Contact Cherry Road for this information if you do not already have it.-
Enter the Export Folder Path.
-
Enter the Import Folder Path.
-
Enter the Host site.
-
Enter the Port, if necessary.
- Enter your Cherry Road SFTP Username and Password credentials.
-
-
Click Save.
-
Click the Active check box to flag this integration as your current, active integration.
Note: All required SFTP configuration fields must be saved before an integration can be marked Active. -
Do an initial Account Information Import. The account import file should be in .CSV format with the following four columns: AccountNumber, AccountName, AccountType, and Status. A sample import file that can be used as a template can be found here - Sample Chart of Accounts Import.
-
First, click the Calendar to set an "as of" date. This is telling TITAN that the imported accounts are active as of the entered date. Typically, this is the beginning of a fiscal year.
Note: The Manually Import Accounts button will not activate until a date is chosen. -
Click Manually Import Accounts to open the Upload Chart of Account File modal.
-
Click Choose File to open File Explorer. Locate the saved import file and click Open.
-
Once the opened file has been added to the Upload Chart of Account File modal, click Upload.
-
Track the import status from the Financial System Integration Events utility.
-
-
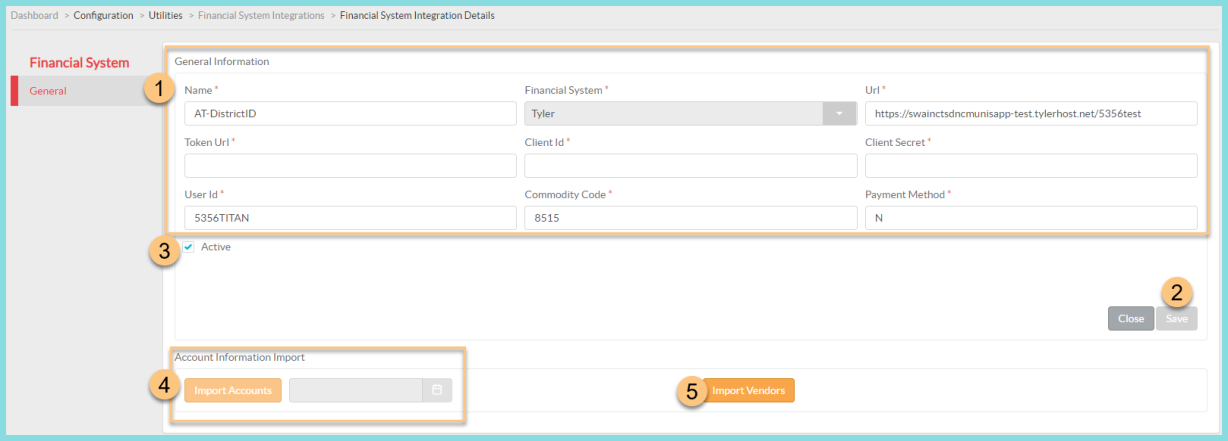
Complete the General Information section with your Tyler client information.
-
View or edit the integration Name.
-
Notice the selected integrated Financial System.
-
Enter your district URL.
-
Enter the Token URL.
-
Enter your Client ID.
-
Enter your Client Secret.
-
Enter your User ID.
-
Enter the Commodity Code.
-
Enter a Payment Method.
-
-
Click Save.
-
Click the Active check box to flag this integration as your current, active integration.
Note: All required General Information fields must be saved before the integration can be marked Active. -
Do an initial Account Information Import.
-
First, click the Calendar to set an "as of" date. This is telling TITAN that the imported accounts are active as of the entered date. Typically, this is the beginning of a fiscal year.
Note: The Import Accounts button will not activate until a date is chosen. -
Click Import Accounts. A confirmation modal will appear. Click Yes to confirm and initiate account import.
Note: You can monitor the status of the import on the Financial Systems Integration Events screen.
-
-
Click Import Vendors. A confirmation modal will appear. Click Yes to confirm and initiate a vendor import from Tyler.
Note: You can monitor the status of the import on the Financial Systems Integration Events screen.
-
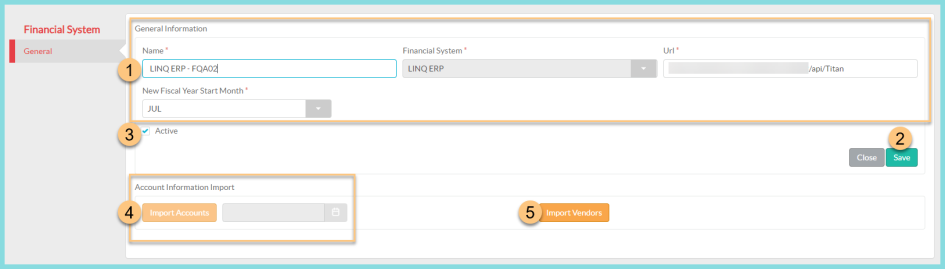
Complete the General Information section with your LINQ ERP client information.
-
View or edit the integration Name, if needed.
-
Notice the integrated Financial System.
-
Enter your LINQ ERP URL.
-
Select the New Fiscal Year Start Month from the drop-down menu.
-
-
Click Save.
-
Click the Active check box to flag this integration as your current, active integration.
Note: All required General Information fields must be saved before the integration can be marked Active. -
Do an initial Account Information Import. This import can be repeated at any time and ensures proper building, account type, and account code configuration before running the Revenue or Inventory Summary. An import must be completed before completing the FC1A configuration.
-
First, click the Calendar to set an "as of" date. This is telling TITAN that the imported accounts are active as of the entered date. Typically, this is the beginning of a fiscal year.
Note: The Import Accounts button will not activate until a date is chosen. -
Click Import Accounts. A confirmation modal will appear. Click Yes to confirm and initiate account import.
Note: You can monitor the status of the import on the Financial Systems Integration Events screen.
-
-
Click Import Vendors. A confirmation modal will appear. Click Yes to confirm and initiate a vendor import from LINQ ERP.
Note: You can monitor the status of the import on the Financial Systems Integration Events screen
-
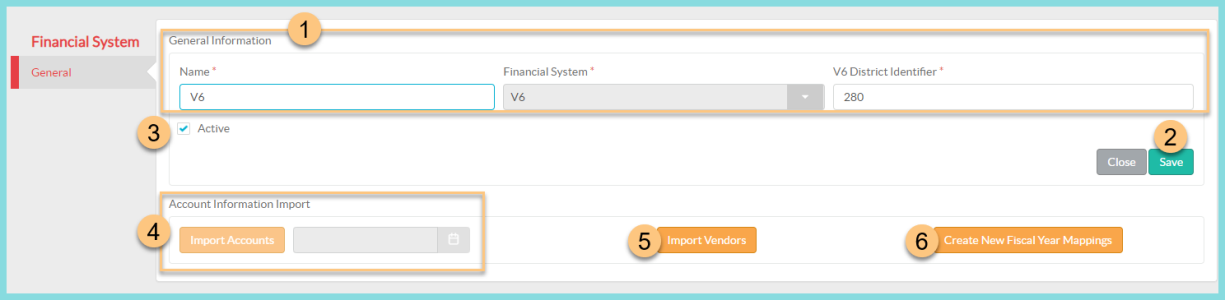
Verify the General Information for the integration.
-
Change the integration Name, if needed.
-
Notice the integrated Financial System.
-
Enter your V6 District Identifier.
-
-
Click Save.
-
Click the Active check box to flag this integration as your current, active integration.
Note: All required General Information fields must be saved before the integration can be marked Active. -
Do an initial Account Information Import. This import can be repeated at any time and ensures proper building, account type, and account code configuration before running the Revenue or Inventory Summary. An import must be completed before completing the FC1A configuration.
-
First, click the Calendar to set an "as of" date. This is telling TITAN that the imported accounts are active as of the entered date. Typically, this is the beginning of a fiscal year.
Note: The Import Accounts button will not activate until a date is chosen. -
Click Import Accounts. A confirmation modal will appear. Click Yes to confirm and initiate account import.
Note: You can monitor the status of the import on the Financial Systems Integration Events screen.
-
-
Click Import Vendors. A confirmation modal will appear. Click Yes to confirm and initiate a vendor import from LINQ ERP NC.
Note: You can monitor the status of the import on the Financial Systems Integration Events screen. -
Click Create New Fiscal Year Mappings to map accounts for the start of a new fiscal year.
-
Verify the General Information for the integration.
-
Change the integration Name, if needed.
-
Notice the integrated Financial System.
-
-
Click Save.
-
Click the Active check box to flag this integration as your current, active integration.
Note: All required General Information fields must be saved before the integration can be marked Active. - Do an initial Account Information Import. The account import file should be in .CSV format with the following four columns: AccountNumber, AccountName, AccountType, and Status. A sample import file that can be used as a template can be found here - Sample Chart of Accounts Import.
First, click the Calendar to set an "as of" date. This is telling TITAN that the imported accounts are active as of the entered date. Typically, this is the beginning of a fiscal year.
Note: The Manually Import Accounts button will not activate until a date is chosen.Click Manually Import Accounts to open the Upload Chart of Account File modal.
Click Choose File to open File Explorer. Locate the saved import file and click Open.
Once the opened file has been added to the Upload Chart of Account File modal, click Upload.
Track the import status from the Financial System Integration Events utility.